I'm very, very excited about my early birthday present- on Saturday Morning I'm hopping on a bus to Indianapolis to attend the North American Handmade Bicycle Show.
I first heard about this show last year when it was in Portland.Lots of very pretty bicycles should be on hand if last years examples are anything to go by- that's where that bull-horned bamboo bike from Calfee was shown. Many makers that I only know from trawling the web will be there with the very best examples of their craft on display- I's so excited....
I am bringing my camera, and I plan on taking many pictures which will find their way here.
Erick
P.S.: I've made a few changes to the blog- There are links to the blogs I read regularly, and I'm trying out the "followers" widget.

Thursday, February 26, 2009

Saturday, January 10, 2009
Veldtschoen Photo essay
Here is the completed photo essay on building a veldtschoen-or stitchdown- style boot:
This is not a perfect example, but I'll point out some general aspects of the veldtschoen:
This is a very casual construction, especially without mechanical assists used in factory production and it has a distinct look that exaggerates the shape of the toe.
Construction:
The primary feature is the upper being flanged out to create a shelf for the upper to be sewn to a midsole- sometime referred to as a runner. In most constructions, a particular lasting pincer is used, which has a hammer to lever over the last bottom and pull it tight. Without this assist it is extremely difficult to get the vamp area tight to the last- even after using some questionable aids....
The last for a veldtschoen should have a distinct feather edge all round, with a full arch. When machine stitching the midsole on, it is desirable to have a bevel all round the feather edge of the last. As in the photos, the shoe is presented to the outsole stitcher "bottoms-up". The work table presses against the shoe upper and the curved awl passes through a hole in it, which is set back between 1/16th and 1/8th inch from the leading edge. The bevel in the last allows the work table to press the upper into the void. This offsets the distance of the awl passing through the hole, placing the stitch right at the crease. The photos don't illustrate this adequately and will need to be supplemented with illustrations later.
Aesthetics:
Depending on the leathers chosen, some construction details- both desirable and not- will show through in the end.
Many shoemakers employ side linings in both cemented and sewn footwear- this is not very practical in this application and soft leathers are going to give it a "slipper-ish" look to the way the material holds the foot. It is not unusual for Veldtschoens to be unlined.
Other leather choices will certainly offer different results- I will certainly build this way again. Given the leathers I go back to time and time again, my inclination is to focus on my previously favored variation.
I hope you find this informative. Comments- whether for clarification- or correction- are welcome.
This is not a perfect example, but I'll point out some general aspects of the veldtschoen:
This is a very casual construction, especially without mechanical assists used in factory production and it has a distinct look that exaggerates the shape of the toe.
Construction:
The primary feature is the upper being flanged out to create a shelf for the upper to be sewn to a midsole- sometime referred to as a runner. In most constructions, a particular lasting pincer is used, which has a hammer to lever over the last bottom and pull it tight. Without this assist it is extremely difficult to get the vamp area tight to the last- even after using some questionable aids....
The last for a veldtschoen should have a distinct feather edge all round, with a full arch. When machine stitching the midsole on, it is desirable to have a bevel all round the feather edge of the last. As in the photos, the shoe is presented to the outsole stitcher "bottoms-up". The work table presses against the shoe upper and the curved awl passes through a hole in it, which is set back between 1/16th and 1/8th inch from the leading edge. The bevel in the last allows the work table to press the upper into the void. This offsets the distance of the awl passing through the hole, placing the stitch right at the crease. The photos don't illustrate this adequately and will need to be supplemented with illustrations later.
Aesthetics:
Depending on the leathers chosen, some construction details- both desirable and not- will show through in the end.
Many shoemakers employ side linings in both cemented and sewn footwear- this is not very practical in this application and soft leathers are going to give it a "slipper-ish" look to the way the material holds the foot. It is not unusual for Veldtschoens to be unlined.
Other leather choices will certainly offer different results- I will certainly build this way again. Given the leathers I go back to time and time again, my inclination is to focus on my previously favored variation.
I hope you find this informative. Comments- whether for clarification- or correction- are welcome.
Friday, November 7, 2008
Complicated Patterns Plus More Last Remodeling
Continuing my exploration of athletic style uppers, here is my latest work-in-progress:

The beige leather is some orthopedic hide I picked up several years ago- stretchy, but still heavy. Stains easily for that lived-in look sooner rather than later. The spongy hand made some of the edge stitching disagreeable
The rust-ish color is a totally random find from the ren-faire last summer. It's a split- the color caught my eye and it was dirt cheap. My students could tell you how I grumble about split leathers, but I may have to concede that it could have its uses.
I'm crossing my fingers that they make a good combination.
______________________________
Last remodeling- small update:
I am continuing the last remodeling as a demo for my students. The photo below shows the leather feathered to the last:

The changes to the bottom will necessitate re-contouring the sides and bottom shape.
The beige leather is some orthopedic hide I picked up several years ago- stretchy, but still heavy. Stains easily for that lived-in look sooner rather than later. The spongy hand made some of the edge stitching disagreeable
The rust-ish color is a totally random find from the ren-faire last summer. It's a split- the color caught my eye and it was dirt cheap. My students could tell you how I grumble about split leathers, but I may have to concede that it could have its uses.
I'm crossing my fingers that they make a good combination.
______________________________
Last remodeling- small update:
I am continuing the last remodeling as a demo for my students. The photo below shows the leather feathered to the last:

The changes to the bottom will necessitate re-contouring the sides and bottom shape.
Sunday, October 26, 2008
Morning in Chicago
A couple of images of the city at dawn courtesy of my phone just a few days ago:
We get some interesting cloud formations at the lakefront. On some mornings it looks like downtown is sitting in front of a massive stage curtain.
A few months ago, I took this shot of high rises from the lakefront path:
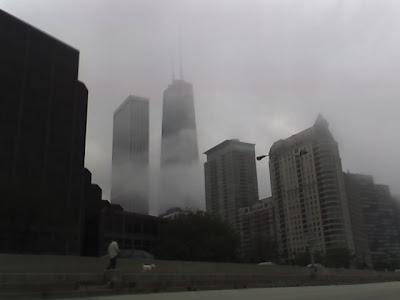
We get some interesting cloud formations at the lakefront. On some mornings it looks like downtown is sitting in front of a massive stage curtain.
A few months ago, I took this shot of high rises from the lakefront path:
Sunday, August 10, 2008
New Concept Illustrations
A few recent projects for my portfolio, broken into a couple of entries.
First off, a pair of designs illustrated in marker and pencil on paper. As an exorcise in branding, I've worked Pumas branding into the construction. The two designs shared a color story, though one is distinctly more tongue in cheek. I worked through a couple of ideas for closures and settled on lacing for the trail runner. The yellow "cleats" I'm envisioning in a firmer material I'm calling a skeleton. Bottom drawings are still a WIP:
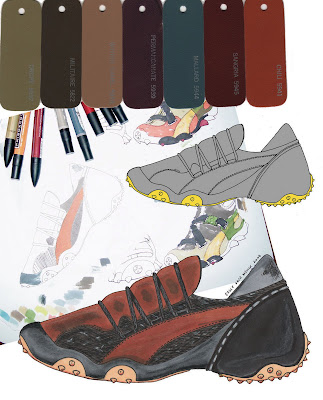
The trailosaurus uses a stretch fabric "sock" with a strap and pinch snap fastener. The aggressive cleats referencing teeth and bony protrusions on dinosaurs:
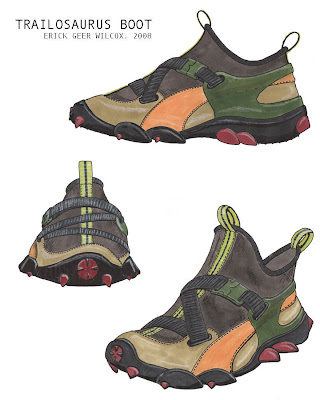
First off, a pair of designs illustrated in marker and pencil on paper. As an exorcise in branding, I've worked Pumas branding into the construction. The two designs shared a color story, though one is distinctly more tongue in cheek. I worked through a couple of ideas for closures and settled on lacing for the trail runner. The yellow "cleats" I'm envisioning in a firmer material I'm calling a skeleton. Bottom drawings are still a WIP:
The trailosaurus uses a stretch fabric "sock" with a strap and pinch snap fastener. The aggressive cleats referencing teeth and bony protrusions on dinosaurs:
New Folding Boots
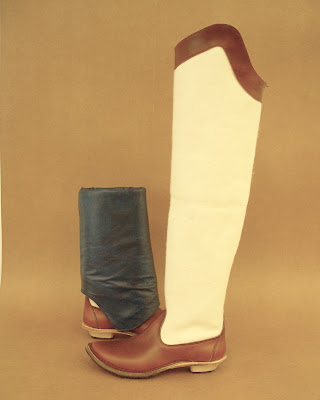
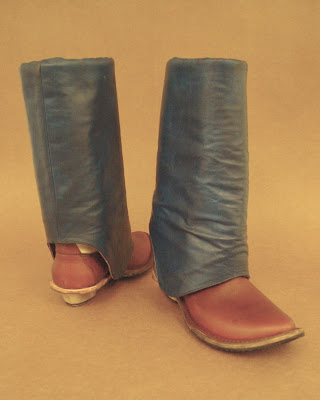
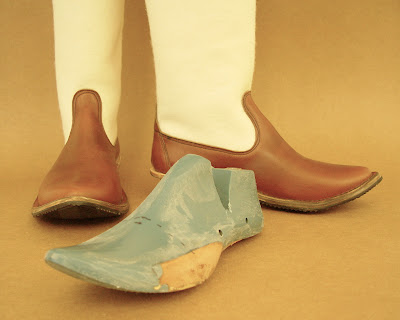
Before flying to Las Vegas, I finished up these new versions of the folding boot. This time, I used a wool blend felt and Horweens rust leather on the outside and the customers blue leather to line the shaft:
Sunday, June 8, 2008
Simple Sandal Project, plus an inquiry
As a demonstration for my students, I documented the creation of a simple pair of sandals.
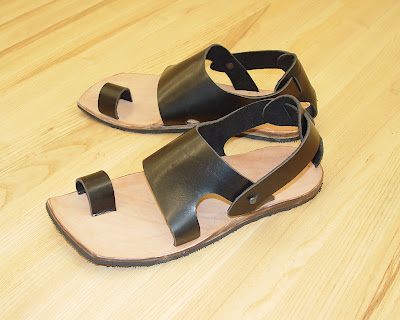
When i first started learning about shoes, this was a project we were required to do, as a way to get us familiar with the landscape of the foot.
And anyways, footwear can't always be complicated, can it?
On another note, I've been flirting with some simple projects- not brilliant design, but stuff that's fun and close to my other interests. I've made a pair of leather handlebar grips:
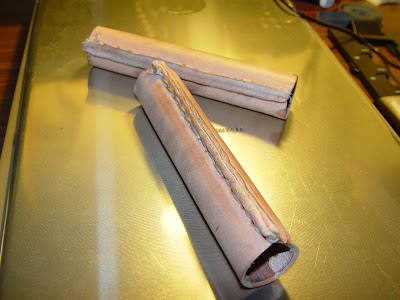
They are very crude right now, but let me know if this is something you are interested in.
When i first started learning about shoes, this was a project we were required to do, as a way to get us familiar with the landscape of the foot.
And anyways, footwear can't always be complicated, can it?
On another note, I've been flirting with some simple projects- not brilliant design, but stuff that's fun and close to my other interests. I've made a pair of leather handlebar grips:
They are very crude right now, but let me know if this is something you are interested in.
Tuesday, June 3, 2008
Bicycle Shoes Final
I finished the bicycle shoes today (minus one detail):
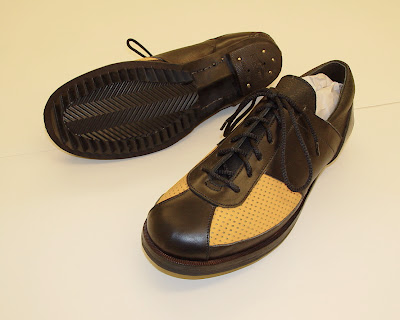

I dyed and waxed the sole and edges for a finished look. For a heel, I just used a western boot toplift. They fit with the look of the shoes.

The outsole still needs to be stitched on, but it may be a while before I can make arrangements to use someones stitcher. Overall I am very pleased with the results. My main goals were to use a different method of standard forme production, and to make an athletically styled shoe. Functionally I think it will take a few more to get the everything where I want it without using hi-tech materials.
I need to:
1) Stiffen the shank area further.
2) Lighten and clean the composite sole
3) Install cleats
Over all I think the upper needs a little more body, which will require a few further materials changes. My bike mechanic really liked the composite sole and agreed that it appeared that it would accept a cleat pretty well.
Tomorrow, I'll need to dig out a pair of trainer insoles and see about wear-testing them.
Erick

I dyed and waxed the sole and edges for a finished look. For a heel, I just used a western boot toplift. They fit with the look of the shoes.

The outsole still needs to be stitched on, but it may be a while before I can make arrangements to use someones stitcher. Overall I am very pleased with the results. My main goals were to use a different method of standard forme production, and to make an athletically styled shoe. Functionally I think it will take a few more to get the everything where I want it without using hi-tech materials.
I need to:
1) Stiffen the shank area further.
2) Lighten and clean the composite sole
3) Install cleats
Over all I think the upper needs a little more body, which will require a few further materials changes. My bike mechanic really liked the composite sole and agreed that it appeared that it would accept a cleat pretty well.
Tomorrow, I'll need to dig out a pair of trainer insoles and see about wear-testing them.
Erick
Friday, May 23, 2008
British Bicycling Videos and Pictures from the DesPlaines River Trail
I found these videos by way of a comment on the website of Acorn Bags. It is one film presented in two sections via YouTube. This just make me giddy and want to move to the UK in the 1950's.
Part 1:
Part 2:
This is the person who posted these clips.
Last weekend, after totally failing to keep up with a group ride out to a northwest suburb, I decided to take the afternoon and try a trail out west. The route is the DesPlaines River Trail- I got to take my bike off pavement for the first time! Here are some pictures:
Here is where I entered from Higgins road:

I almost missed it, here is Higgins road from inside:

Once the trail opened up, it was quite spectacular- especially since I don't get to see the inside of woods very often:

I stopped off where the trail ran right along the river and posed my bike to look quite adventurous!:

And finally, a horrible, horrible picture of a young buck that didn't seem to know what to make of me and my bike:

Part 1:
Part 2:
This is the person who posted these clips.
Last weekend, after totally failing to keep up with a group ride out to a northwest suburb, I decided to take the afternoon and try a trail out west. The route is the DesPlaines River Trail- I got to take my bike off pavement for the first time! Here are some pictures:
Here is where I entered from Higgins road:

I almost missed it, here is Higgins road from inside:

Once the trail opened up, it was quite spectacular- especially since I don't get to see the inside of woods very often:

I stopped off where the trail ran right along the river and posed my bike to look quite adventurous!:

And finally, a horrible, horrible picture of a young buck that didn't seem to know what to make of me and my bike:

Wednesday, April 23, 2008
Original Folding Boot
I was rummaging around my old photo files and found some old work. Below are some pictures of the original model for these boots:
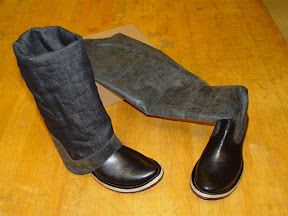
The original models were done with the same Italian leather for the vamp, but the outer shaft is in a locally made garment leather and lined in blue and pink plaid flannel!
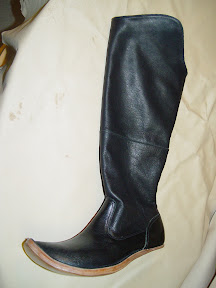
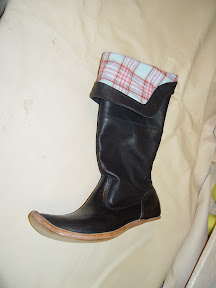
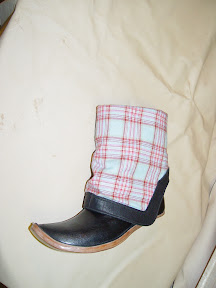
I had a lot of fun with the materials.
I'm also throwing in a picture of another pair in progress:
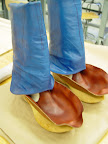
The original models were done with the same Italian leather for the vamp, but the outer shaft is in a locally made garment leather and lined in blue and pink plaid flannel!
I had a lot of fun with the materials.
I'm also throwing in a picture of another pair in progress:
Tuesday, April 22, 2008
Wheels!
After the loss of my Sojourn, I had to find another bike. A while ago, I had sat on a Raleigh Mojave 2.0 to check size, and found it comfortable. I looked in numerous places for a comparatively priced bike that I wasn't appalled by and went with it:

It's not the kind of bike I'm usually into, but it is pretty comfortable, and I will be able to upgrade things easily enough. Before I took it home, I had the shop install my fenders and rack previously installed on my Schwinn. And since most things look good in leather, I've splurged and installed a Brooks B-17 saddle:

Not the best photo- improvements to follow.

It's not the kind of bike I'm usually into, but it is pretty comfortable, and I will be able to upgrade things easily enough. Before I took it home, I had the shop install my fenders and rack previously installed on my Schwinn. And since most things look good in leather, I've splurged and installed a Brooks B-17 saddle:

Not the best photo- improvements to follow.
Sunday, April 20, 2008
Bicycle Shoe Project
One of my recent fascinations are bicycle shoes. Last year I picked up a pair of older (early 90's/late 80's NOS?) SIDI bike shoes- which I promptly took apart to see how they tick. A few days ago I picked up another pair of Italian shoes that look older than they really are (apparently). The shoes are interesting for a few reasons: the uppers are of an incredibly simple pattern, the combination of detailing and material choices to define the functionality and the hardware requirements.
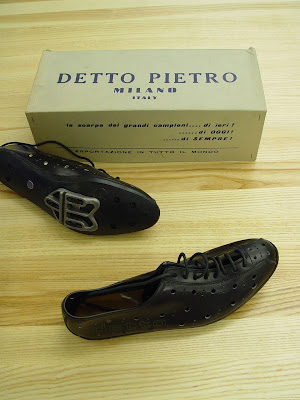
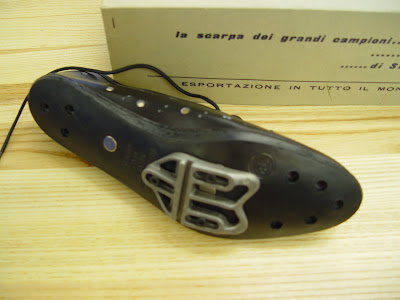
I'm using these shoes as reference pieces to explore a bit of performance footwear, combining full leather construction with the functionality required of a bicycling shoe.
Instead of creating an original last for this exploration, I've had one of my lastmakers pick an athletic last model with a high toe-spring from his library to copy. Pictured is the pair of lasts, One of them is carefully taped for patterning.
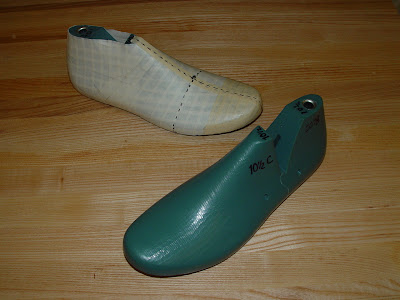
I'll update on this project as it progresses.
Erick
I'm using these shoes as reference pieces to explore a bit of performance footwear, combining full leather construction with the functionality required of a bicycling shoe.
Instead of creating an original last for this exploration, I've had one of my lastmakers pick an athletic last model with a high toe-spring from his library to copy. Pictured is the pair of lasts, One of them is carefully taped for patterning.
I'll update on this project as it progresses.
Erick
Handmade Show Slideshow
As promised a few posts back, I've created a slideshow from the photo essay on the creation of shoes. Later tonight I'll post some on that other project.
The process I use allows me to give preferential treatment to certain leathers, and gives a certain look. It is a combination of contemporary cement construction and a rustic "veldtschoen" (field shoe)- also called a stitch-down. The result is a shoe that is quite sturdy.
Enjoy:
The process I use allows me to give preferential treatment to certain leathers, and gives a certain look. It is a combination of contemporary cement construction and a rustic "veldtschoen" (field shoe)- also called a stitch-down. The result is a shoe that is quite sturdy.
Enjoy:
Tuesday, April 15, 2008
Gunton 2007
Lest anyone who hasn't looked at my website (which hasn't been updated in ages) think I only use the Elf last, I thought I would post a pair of shoes I did last spring.
The design is a classic oxford with a button closure. I used a last I started developing for mens or menswear styles- I call it the Gunton, named after my father and grandfather. The last was introduced at the One of A Kind Show and Sale 2006 (!).

I'm really pleased with the color combinations- rust quarters with black galosh and antiqued brass buttons. The upper leathers are locally made here in Chicago, while the lining is a veg-tan of unknown origin.
These are pretty typical of the aesthetic I've been developing over the last few years. If time allows, I'm going to pull together a handstitched shoe on this last.
Erick
__________
Up next: I'm currently working on a bicycle style shoe, which I'll post some pictures in a few days.
The design is a classic oxford with a button closure. I used a last I started developing for mens or menswear styles- I call it the Gunton, named after my father and grandfather. The last was introduced at the One of A Kind Show and Sale 2006 (!).

I'm really pleased with the color combinations- rust quarters with black galosh and antiqued brass buttons. The upper leathers are locally made here in Chicago, while the lining is a veg-tan of unknown origin.
These are pretty typical of the aesthetic I've been developing over the last few years. If time allows, I'm going to pull together a handstitched shoe on this last.
Erick
__________
Up next: I'm currently working on a bicycle style shoe, which I'll post some pictures in a few days.
Tuesday, April 1, 2008
April 1st- no joking around, please
Here is a picture of my new bike- I'm still waiting on the new stem, but I'm slowly mounting some of my old road bike accessories.

The weekend it arrived I road it out to the Chicago Bike Show at the Donald E Stephens Convention Center in Rosemont. Somewhere around fifteen miles to get there, rode back about ten miles after a bus ride to more familiar surroundings. It didn't even occur to me that one of the things I picked up at the show was a bike map of Chicago and northeast Illinois (slaps hand on forehead). The route I took out there was pretty sketchy once traffic picked up for the day.
I thought I would include a couple of pictures of a pair of feral cats that have adopted us.


We affectionately call them "the Buddies" since they've been joined at the hip since they were kittens in the alley. We had been saying hi and talking to them for months until one day Orange followed me home and sat outside the door in wait. During the worst of the Chicago winter, we started giving him our leftovers before graduating to bag of kibble (our cat Lori has special dietary needs, so she doesn't share). Eventually Orange brought along Little Girl- a scruffy, timid and cross-eyed tabby- we think they are brother and sister. For feral cats they certainly don't act the part- we're pretty sure one of our neighbors was also feeding them for a while and at the same time as us (sneaky!). Little girl is still skittish, but both of them like us to hang out on the porch while they eat. Orange likes to get his head scratched and won't be getting any points for being an independent spirit (though he guards the porch from other cats fiercely).

The weekend it arrived I road it out to the Chicago Bike Show at the Donald E Stephens Convention Center in Rosemont. Somewhere around fifteen miles to get there, rode back about ten miles after a bus ride to more familiar surroundings. It didn't even occur to me that one of the things I picked up at the show was a bike map of Chicago and northeast Illinois (slaps hand on forehead). The route I took out there was pretty sketchy once traffic picked up for the day.
I thought I would include a couple of pictures of a pair of feral cats that have adopted us.


We affectionately call them "the Buddies" since they've been joined at the hip since they were kittens in the alley. We had been saying hi and talking to them for months until one day Orange followed me home and sat outside the door in wait. During the worst of the Chicago winter, we started giving him our leftovers before graduating to bag of kibble (our cat Lori has special dietary needs, so she doesn't share). Eventually Orange brought along Little Girl- a scruffy, timid and cross-eyed tabby- we think they are brother and sister. For feral cats they certainly don't act the part- we're pretty sure one of our neighbors was also feeding them for a while and at the same time as us (sneaky!). Little girl is still skittish, but both of them like us to hang out on the porch while they eat. Orange likes to get his head scratched and won't be getting any points for being an independent spirit (though he guards the porch from other cats fiercely).
Wednesday, February 13, 2008
Bull-Horn-ed bike
Short post, but browsing through a gallery of photos from the 2008 North American Handbuilt Bike Show, I saw this picture:

The bike frame is made out of bamboo- it's by Calfee Design, who specialize in carbon fiber frames- here is the link directly to the Bamboo line. I think the bull horns make it.
I don't know this person that took the picture, but if you're interested in bicycles check out his gallery I linked above.
I'm getting a touring bike if the stars align- I'll post pictures when it happens.
Erick

The bike frame is made out of bamboo- it's by Calfee Design, who specialize in carbon fiber frames- here is the link directly to the Bamboo line. I think the bull horns make it.
I don't know this person that took the picture, but if you're interested in bicycles check out his gallery I linked above.
I'm getting a touring bike if the stars align- I'll post pictures when it happens.
Erick
Thursday, November 15, 2007
Red Shoes
I am still deciding on how I want to present the photo essay- I abbreviated it further for a forum on shoe-making- only elaborating on specific construction details that deviate from some traditional or common types of shoe constructions. Even the short-short version is twelve images- I think it may be best to create a gallery, rather than post directly into the blog posts. Ah, decisions... until then, read on.

Back in June of 2007 I closed my "factory" space. This is one of the last few pairs of shoes I made before then that have not been placed on my main web site: riotgeer.com.
This is a pair of red shoes with a single set of eyelets with a French-bound edge. This was the first time I've ever used this type of edge treatment- I threw away several attempts. The final piece turned out alright, though it will need further refinement if I am to do it again. The shoe upper itself is essentially a pump, but the eyelet flanges presented a more complicated edge to bind. Most examples I've handled used bias fabric and present a much more delicate edge.

Back in June of 2007 I closed my "factory" space. This is one of the last few pairs of shoes I made before then that have not been placed on my main web site: riotgeer.com.
This is a pair of red shoes with a single set of eyelets with a French-bound edge. This was the first time I've ever used this type of edge treatment- I threw away several attempts. The final piece turned out alright, though it will need further refinement if I am to do it again. The shoe upper itself is essentially a pump, but the eyelet flanges presented a more complicated edge to bind. Most examples I've handled used bias fabric and present a much more delicate edge.
Friday, November 2, 2007
Handmade Shoes

As promised, here is a picture of the shoes made for the Handmade exhibit. Black t-strap mary-jane style with fire-engine red counter-covers. The black and red leather I used is locally produced.
Erick
Reviewing 2007: process

At the beginning of 2007 I participated in an exhibit of handmade arts and goods at the Chicago Tourism Center Gallery. For the exhibit I produced an abbreviated photo essay on the steps I use to create shoes.
The image is of myself standing with the display. Behind me is the photo essay. In the display case are the resulting shoes I made for my fiance Leigh Ann.
I will be posting more images from this exhibit- including the shoes.
Erick
Wednesday, October 31, 2007
Folding Boots

I thought that for my first post I would show a picture of my most recent creations.
These boots were made for a colleague where I teach and based on an experimental boot from a couple of years ago. The vamps or "galoshes" are made from an Italian Veg-tan leather. The boot shafts are in an "antiqued" garment leather, lined with denim-weave linen.
I hope you enjoy this introduction to what I do.
Erick
Subscribe to:
Posts (Atom)